
Windows Task Scheduler
In Windows systems you should use the Task Scheduler to run the queue processor at one minute intervals.
Create the cron batch file
Use a text editor and create a batch file containing the following. Remember to replace the paths to php.exe and cron.php with the actual ones.c:\xampp\php\php.exe "C:\path\to\wmdsed5\cron.php"
Name this batch file cron.bat and save it to the root of Watch My Domains SED installation folder.
Instead of using PHP, you can also use the Windows version of wget
to run the queue processor. Download and install wget for Windows and then replace the contents
of cron.bat with something like...
"path\to\wget.exe" -q -O - "http://localhost/cron.php?key=f3c56c0741c6f3b4"
Make sure that the path to wget and the URL are set properly and the CLI authorization key has the correct value.
You can find the CLI authorization key
from the 'Authentication' tab of 'App Settings' panel. The ajax parameter is optional.
You can get wget for Windows from here.
Open the Windows shell / command line and execute the cron.bat script after changing
your directory to where Watch My Domains SED is installed. Make sure that
it runs without any error. Do not proceed further unless you get this working.
Create a VB Script File
If you run the batch file directly from the Task Scheduler, it will popup an ugly looking Window. So we will use a VB script that runs the batch file in a hidden window.
Use a text editor to create a VBS file containing the following. Again, remember to replace the path to cron.bat with your path.
Dim WinScriptHost
Set WinScriptHost = CreateObject("WScript.Shell")
WinScriptHost.Run Chr(34) & "C:\Users\Codepunch\Documents\Sites\wmdsed5\cron.bat" & Chr(34), 0
Set WinScriptHost = Nothing
Name this VBS file cron.vbs and save it to the root of Watch My Domains SED installation folder. You should test this also from the Windows command line before proceeding.
Create the Task Scheduler Event
Copy the following and paste it into a text file. Edit the contents inside the <Arguments> </Arguments>section to include the correct path to the the VBS file created above. Save the file to some location on your hard disk as sed5.xml
TypeTask Scheduler into the Windows search box and start the Task Scheduler application.
Select import tasks from the 'Actions' panel at right and specify the sed5.xml file you saved above.
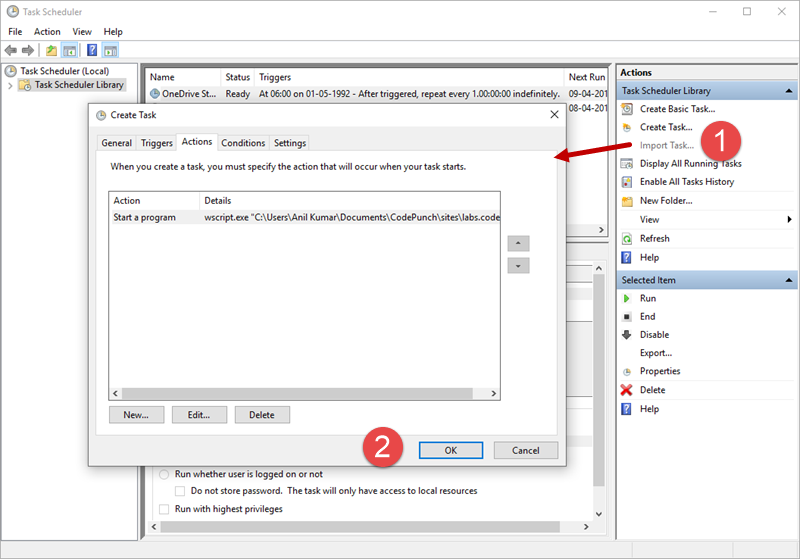
Inspect and satisfy yourself that all the selected options are right, then click 'OK' to create the task.
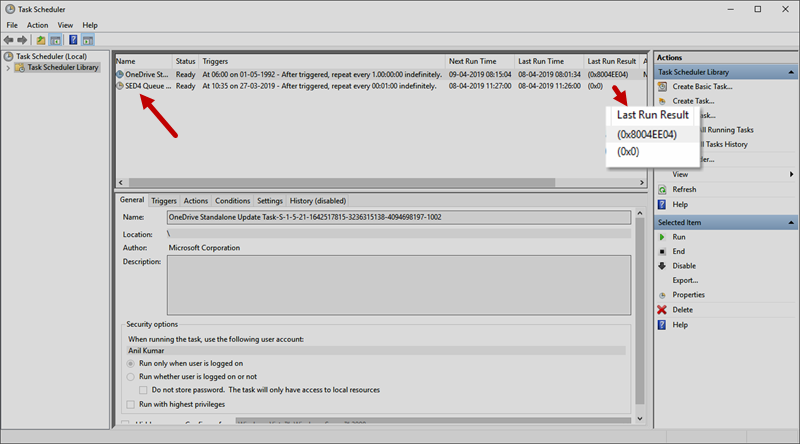
Make sure that you see the Operation completed successfully message or a 0x0 result code under the "Last Run Result" column.